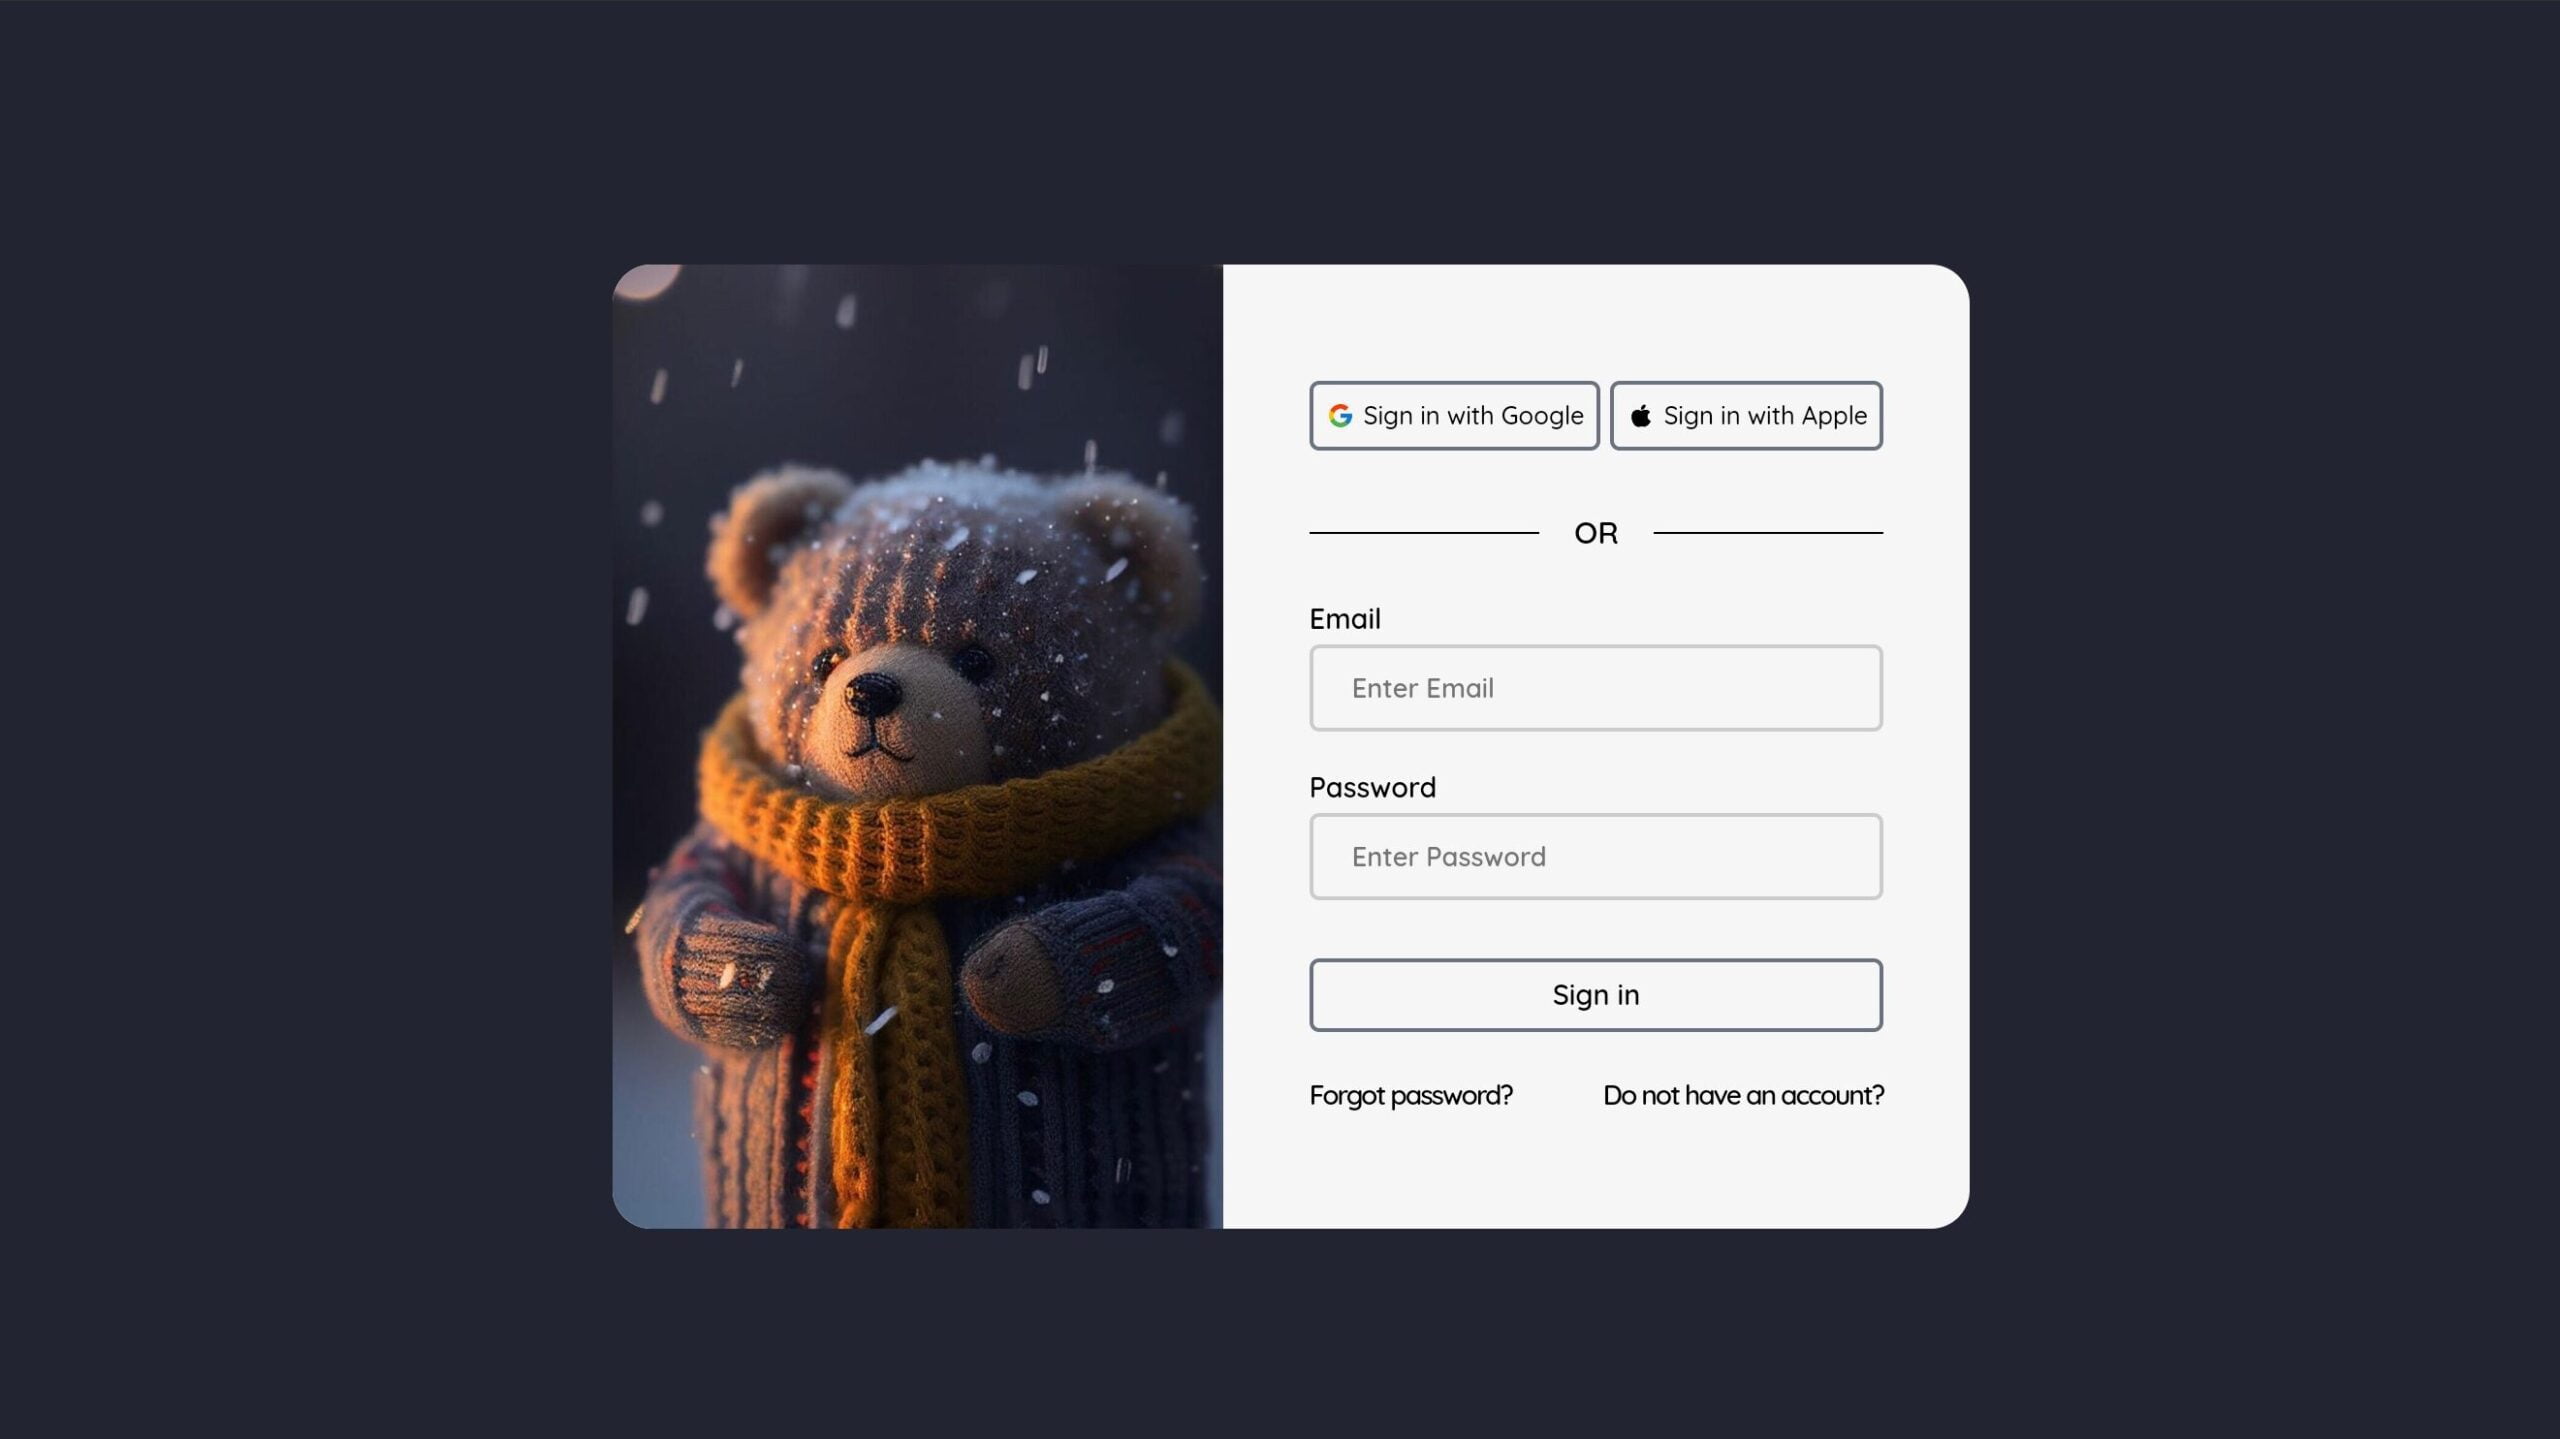
Welcome to the comprehensive guide on crafting a captivating Responsive Sign in Form using JavaScript! In this tutorial, we’ll embark on a journey through HTML, CSS, and JavaScript to create an engaging and user-friendly sign-in experience. From establishing the foundational HTML structure to infusing dynamic functionality with JavaScript, we’ll guide you through each step.
Join us in this coding adventure as we delve into the world of front-end development, enhancing your skills in layout design and form interactivity. Whether you’re a seasoned coder or just beginning, this tutorial promises to empower you with the knowledge to construct a sleek and responsive sign in form for your website.
Let’s dive into the intricacies of building a Responsive Sign in Form that not only meets the needs of your project but also contributes to your proficiency in web development.
Join Our Telegram Channel to Download the Project Source Code: Click Here
Steps to Set Up the Responsive Sign in Form:
Please follow this Step-by-Step Guide to Create and Setup the Responsive Sign in Form using JavaScript, HTML and CSS —
Begin by creating a folder for your project before creating the Responsive Sign in Form. Inside this folder, create three files: index.html, style.css, and script.js. The HTML file sets the foundation, the CSS file styles the elements, and the JavaScript file brings interactivity.
Step 1: HTML Structure
Open index.html and set up the basic structure. Use the provided HTML code to create the main layout, including a left-side image and a right-side form for the sign-in.
<!DOCTYPE html>
<html lang="en">

<head>
    <meta charset="UTF-8">
    <meta name="viewport" content="width=device-width, initial-scale=1.0">
    <title>signin form page</title>
</head>

<body>

    <div id="particles-js" class="snow"></div>

    <main>
        <div class="left-side"></div>

        <div class="right-side">
            <form>
                <div class="btn-group">
                    <button class="btn">
                        <img class="logo"
                            src="https://github.com/ecemgo/mini-samples-great-tricks/assets/13468728/d1c98974-c62d-4071-8bd2-ab859fc5f4e9"
                            alt="" />
                        <span>Sign in with Google</span>
                    </button>
                    <button class="btn">
                        <img class="logo"
                            src="https://github.com/ecemgo/mini-samples-great-tricks/assets/13468728/59c1561b-8152-4d05-b617-0680a7629a0e"
                            alt="" />
                        <span>Sign in with Apple</span>
                    </button>
                </div>

                <div class="or">OR</div>

                <label for="email">Email</label>
                <input type="text" placeholder="Enter Email" name="email" required />

                <label for="password">Password</label>
                <input type="password" placeholder="Enter Password" name="password" required />

                <button type="submit" class="login-btn">Sign in</button>
                <div class="links">
                    <a href="#">Forgot password?</a>
                    <a href="#">Do not have an account?</a>
                </div>
            </form>
        </div>
    </main>
</body>
</html>
Step 2: Styling with CSS
In the style.css file, add the provided styles to enhance the visual appeal of the form. The CSS includes settings for buttons, inputs, and the overall layout. Customize as needed.
@import url("https://fonts.googleapis.com/css2?family=Quicksand:wght@300;400;500;600;700&display=swap");

        *,
        *::before,
        *::after {
            margin: 0;
            padding: 0;
            box-sizing: border-box;
            font-family: "Quicksand", sans-serif;
        }

        body {
            display: flex;
            justify-content: center;
            align-items: center;
            min-height: 100vh;
            width: 100%;
            background: #222431;
            padding: 40px 20px;
        }

        /* Snow */

        #particles-js {
            position: absolute;
            width: 100%;
            height: 100%;
            z-index: -1;
        }

        main {
            display: grid;
            grid-template-columns: 45% 55%;
            place-items: center;
            background: #f6f6f6;
            width: min(700px, 95%);
            border-radius: 20px;
        }

        /* Left Side */

        .left-side {
            height: 100%;
            width: 100%;
            background-image: url(https://github.com/ecemgo/mini-samples-great-tricks/assets/13468728/64ef8d9a-9202-4543-b838-82f4c7c91ccf);
            background-repeat: no-repeat;
            background-size: cover;
            background-position: center;
            pointer-events: none;
            border-radius: 20px 0 0 20px;
        }

        /* Right Side */

        .right-side {
            padding: 60px;
        }

        /* Button Group */

        .btn-group {
            display: flex;
            flex-direction: row;
            justify-content: space-between;
            align-items: center;
            gap: 5px;
            margin-bottom: 32px;
        }

        .btn-group .btn {
            display: flex;
            align-items: center;
            column-gap: 4px;
            width: max-content;
            font-size: 0.8rem;
            font-weight: 500;
            padding: 8px 6px;
            border: 2px solid #6b7280;
            border-radius: 5px;
            background-color: #f6f6f6;
            transform: scale(1);
            cursor: pointer;
            transition: transform 0.1s ease, background-color 0.5s, color 0.5s;
        }

        .btn-group .btn:focus {
            transform: scale(0.97);
        }

        .btn-group .btn:hover {
            background-color: #000;
            color: #eee;
        }

        .btn img {
            width: 16px;
            height: 16px;
        }

        .logo {
            display: flex;
            align-items: center;
            justify-content: center;
            background: #f6f6f6;
            border-radius: 50%;
            padding: 2px;
        }

        /* OR */

        .or {
            position: relative;
            text-align: center;
            margin-bottom: 24px;
            font-size: 1rem;
            font-weight: 600;
        }

        .or::before,
        .or::after {
            content: "";
            position: absolute;
            top: 50%;
            width: 40%;
            height: 1px;
            background: #000;
        }

        .or::before {
            left: 0;
        }

        .or::after {
            right: 0;
        }

        /* Inputs and Labels */

        input {
            width: 100%;
            padding: 12px 20px;
            border: 2px solid #ccc;
            outline: 0;
            border-radius: 5px;
            background-color: transparent;
            margin: 4px 0 18px;
            font-size: 0.85rem;
            font-weight: 600;
            transition: all 0.5s;
        }

        input:focus {
            border: 2px solid #000;
        }

        input:-webkit-autofill,
        input:-webkit-autofill:hover,
        input:-webkit-autofill:focus,
        input:-webkit-autofill:active {
            -webkit-background-clip: text;
            -webkit-text-fill-color: #000;
            transition: background-color 5000s ease-in-out 0s;
        }

        label {
            font-weight: 600;
            font-size: 0.9rem;
        }

        /* Login Button */

        .login-btn {
            width: 100%;
            font-size: 0.9rem;
            font-weight: 600;
            padding: 8px 24px;
            margin: 12px 0 24px;
            border: 2px solid #6b7280;
            border-radius: 5px;
            background-color: #f6f6f6;
            cursor: pointer;
            transition: all 0.5s;
        }

        .login-btn:hover {
            background-color: #000;
            color: #eee;
        }

        /* Links */

        .links {
            display: flex;
            flex-direction: row;
            justify-content: space-between;
        }

        a:link,
        a:visited,
        a:hover,
        a:active {
            text-decoration: none;
        }

        a {
            color: #000;
            font-size: 0.88rem;
            font-weight: 600;
            letter-spacing: -1px;
            transition: all 0.4s ease;
        }

        a:hover {
            color: rgb(13, 133, 185);
        }
Step 3: JavaScript Functionality
Integrate the JavaScript code provided in script.js to add interactivity to the form. The script includes particle animation and button functionalities. Customize the code based on your project requirements.
        particlesJS("particles-js", {
            particles: {
                number: {
                    value: 300,
                    density: {
                        enable: true,
                        value_area: 800,
                    },
                },
                color: {
                    value: "#fff",
                },
                shape: {
                    type: "circle",
                    stroke: {
                        width: 0,
                        color: "#000000",
                    },
                    polygon: {
                        nb_sides: 5,
                    },
                },
                opacity: {
                    value: 1,
                    random: false,
                    anim: {
                        enable: false,
                        speed: 1,
                        opacity_min: 0.1,
                        sync: false,
                    },
                },
                size: {
                    value: 3,
                    random: true,
                    anim: {
                        enable: false,
                    },
                },
                line_linked: {
                    enable: false,
                },
                move: {
                    enable: true,
                    speed: 2,
                    direction: "bottom",
                    random: false,
                    straight: false,
                    out_mode: "out",
                    bounce: false,
                    attract: {
                        enable: false,
                        rotateX: 600,
                        rotateY: 1200,
                    },
                },
            },
            retina_detect: true,
        });
Conclusion:
Congratulations! You’ve successfully set up a responsive sign in form using JavaScript. This project not only enhances your coding skills but also provides hands-on experience in creating a modern and engaging user interface. Feel free to explore the code, experiment with customization, and adapt it to fit your unique projects.
In the ever-evolving landscape of coding, projects like these pave the way for continuous learning and innovation. Embrace the joy of crafting something meaningful with code.
Remember, the key to mastery is not just understanding the code but applying it creatively to build exceptional projects.
For your convenience, the total source code of this “Responsive Sign in Form” project instructional practice is accessible for download by clicking the Download Code button.
Join Our Telegram Channel to Download the Project Source Code: Click Here
Note: Keep in mind that the way to dominate coding is practice. To enhance your skills in JavaScript, HTML & CSS, we recommend recreating other useful website elements such as Custom Button, Reviews Card, Contact Page, Navigation, Login Forms, etc.
More Categories:
Blog • Cards • Fun Project • Game • Hamburger Menu • Login / Signup • Navbar • Testimony / Reviews • To-Do List


