
Maybe you’re interested to know how a coder would ask a person for a date; don’t worry you are about to find out. In this post we are going to look at one way in which a coding whiz can pop that all-important question while having some fun with it too. Using HTML, CSS, and JavaScript mix, charming website which is likely to make someone laugh at it can be created. Let’s get into it and see how you would go about making your own “date request” page.
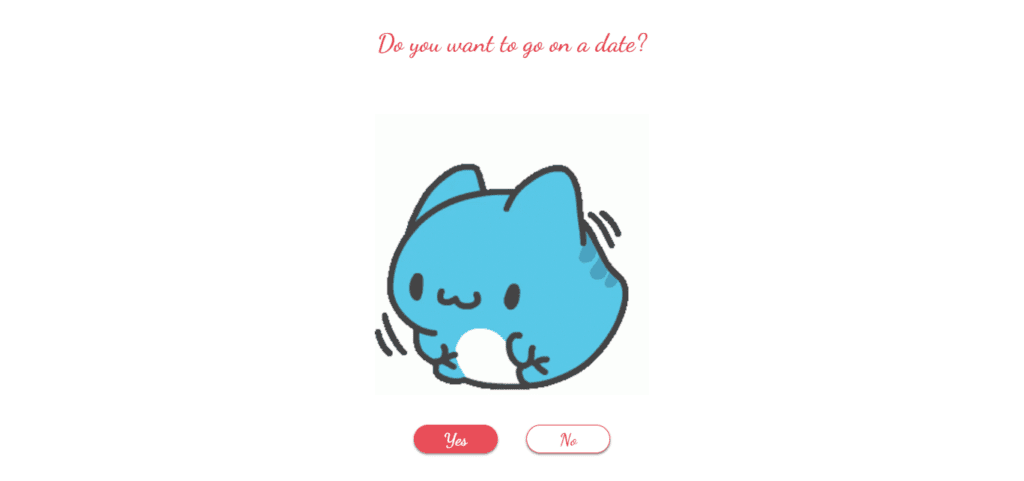
Creating a playful and interactive page, the concept was meant for the user to be asked out for a date. It will contain two buttons which are “Yes” and “No”. When “Yes” is clicked, the screen displays an adorable note alongside a GIF while on the other hand, should someone try clicking, “No” without success, this button plays hide and seek with their pointer making it difficult for them to say no; hence creating an amusing scene that people will remember with joy.
Step-by-Step Guide
Step 1: Writing HTML Markup
Initially, we’ll need to create the basic framework of our web page. We’ll include a heading, a picture (in the form of GIF), as well as two buttons for the user to click on.
<!DOCTYPE html>
<html lang="en">

<head>
    <meta charset="UTF-8">
    <meta name="viewport" content="width=device-width, initial-scale=1.0">
    <title>How a Coder Asks for a Date</title>
    <link rel="stylesheet" href="styles.css">
    <script defer src="script.js"></script>
    <meta name="description" content="A fun and interactive way for coders to ask someone out on a date using HTML, CSS, and JavaScript.">
</head>

<body>

    <div id="wrapper">
        <h2 id="question">Do you want to go on a date?</h2>
        <img id="gif" alt="A cute animated gif" src="https://i.pinimg.com/originals/ea/2d/e8/ea2de8f83e89f316c0a5169d09a0b536.gif" />
        <div id="btn-group">
            <button id="yes-btn">Yes</button>
            <button id="no-btn">No</button>
        </div>
    </div>

</body>
</html>
Step 2: Styling with CSS
Next, we’ll add some CSS to style our page. We’ll use a cursive font to give the page a romantic feel and style the buttons to make them look attractive.
/* Importing a romantic cursive font */
@import url("https://fonts.googleapis.com/css2?family=Dancing+Script:wght@700&display=swap");

/* Resetting default margin and applying the font */
* {
    font-family: "Dancing Script", cursive;
    margin: 0;
}

/* Centering the content */
body {
    display: flex;
    justify-content: center;
    align-items: center;
    min-height: 100vh;
    background-color: #f8f8f8; /* Light background for better contrast */
}

/* Styling the GIF */
#gif {
    height: 100%;
    width: 100%;
    transition: transform 0.3s; /* Smooth scaling effect */
}

#gif:active {
    transform: scale3d(1.3, 1.3, 1.3);
}

/* Styling the heading */
h2 {
    text-align: center;
    color: #e94d58;
    margin-bottom: 100px;
    font-size: 45px;
}

/* Styling the button group container */
#btn-group {
    width: 100%;
    height: 50px;
    display: flex;
    justify-content: center;
    margin-top: 50px;
}

/* Common button styles */
button {
    width: 150px;
    position: absolute;
    height: inherit;
    color: white;
    outline: none;
    cursor: pointer;
    border-radius: 30px;
    box-shadow: 0 2px 4px gray;
    border: 2px solid #e94d58;
    font-size: 30px;
    transition: background 0.3s; /* Smooth background color transition */
}

/* Specific styles for Yes and No buttons */
button:nth-child(1) {
    margin-left: -200px;
    background: #e94d58;
}

button:nth-child(2) {
    margin-right: -200px;
    background: white;
    color: #e94d58;
}

#no-btn {
    cursor: not-allowed;
}
Step 3: Adding JavaScript Functionality
Finally, we’ll add JavaScript to make our buttons interactive. When the user clicks “Yes,” a new message and GIF will appear. If they try to click “No,” the button will move to a random position, making it difficult to click.
 const wrapper = document.getElementById("wrapper");
    const gif = document.getElementById("gif");
    const question = document.getElementById("question");
    const yesBtn = document.getElementById("yes-btn");
    const noBtn = document.getElementById("no-btn");

    yesBtn.addEventListener("click", () => {
        question.innerHTML = "I knew it ❤✨";
        gif.src = "https://i.pinimg.com/originals/ce/63/c2/ce63c26f8747e2181594d2db8787c026.gif";
        noBtn.hidden = true;
        yesBtn.hidden = true;
    });

    noBtn.addEventListener("mouseover", () => {
        const noBtnRect = noBtn.getBoundingClientRect();
        const maxX = window.innerWidth - noBtnRect.width;
        const maxY = window.innerHeight - noBtnRect.height;

        const randomX = Math.floor(Math.random() * maxX);
        const randomY = Math.floor(Math.random() * maxY);

        noBtn.style.left = randomX + "px";
        noBtn.style.top = randomY + "px";
    });

    noBtn.addEventListener("click", () => {
        question.innerHTML = "";
        gif.src = "https://i.pinimg.com/originals/03/a4/28/03a428ee705240475480c7722c6c2b3b.gif";
        noBtn.hidden = true;
        // yesBtn.hidden = true;
    });
For your benefit, the total source code of this instructional exercise is accessible for download by clicking the Download Code button. Moreover, experience a live exhibit of these Create Account Form with JavaScript by getting to the View Live button.
Note: Keep in mind that the way to dominate coding is practice. To enhance your skills in JavaScript, HTML & CSS, we recommend recreating other useful website elements such as Custom Button, Reviews Card, Contact Page, Navigation, Login Forms, etc.


